网络文件共享服务
存储类型分为三种
- 直连式存储:Direct-Attached Storage,简称 DAS
- 存储区域网络:Storage Area Network,简称 SAN
- 网络附加存储:Network-Attached Storage,简称 NAS

三种存储架构的应用场景
- DAS虽然比较古老了,但是还是很适用于那些数据量不大,对磁盘访问速度要求较高的中小企业
- NAS多适用于文件服务器,用来存储非结构化数据,虽然受限于以太网的速度,但是部署灵活,成本低
- SAN则适用于大型应用或数据库系统,缺点是成本高、较为复杂
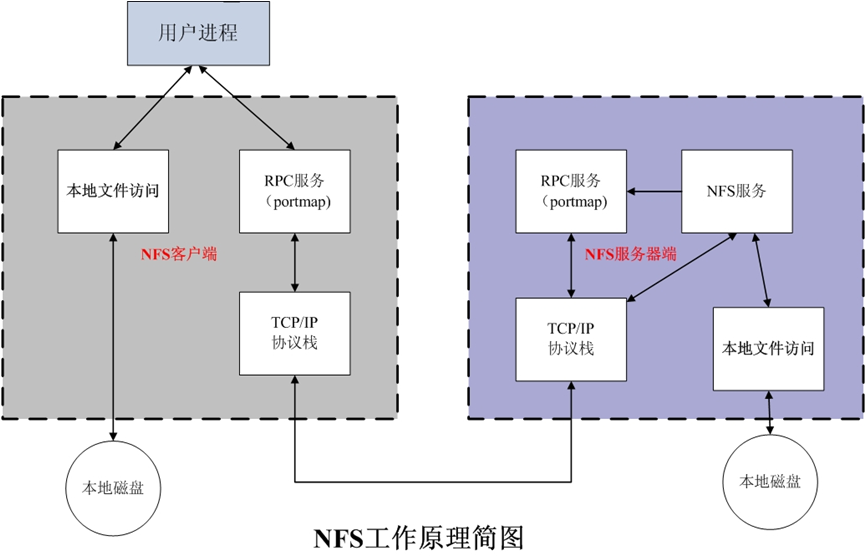
NFS 工作原理
NFS:Network File System 网络文件系统,基于内核的文件系统。Sun 公司开发,通过使用 NFS,用 户和程序可以像访问本地文件一样访问远端系统上的文件,基于RPC(Remote Procedure Call Protocol 远程过程调用)实现
RPC采用C/S模式,客户机请求程序调用进程发送一个有进程参数的调用信息到服务进程,然后等待应答 信息。在服务器端,进程保持睡眠状态直到调用信息到达为止。当一个调用信息到达,服务器获得进程 参数,计算结果,发送答复信息,然后等待下一个调用信息,最后,客户端调用进程接收答复信息,获 得进程结果,然后调用执行继续进行
NFS软件介绍
- 红帽系统: nfs-utils: 包括服务器和客户端相关工具,CentOS8 最小化安装时默认没有安装
- Ubuntu: nfs-server(nfs-kernel-server) 服各器包名,nfs-common 客户端包名
- 端口:2049(nfsd), 其它端口由portmap(111)分配
NFS服务主要进程:
- rpc.nfsd 最主要的NFS进程,管理客户端是否可登录
- rpc.mountd 挂载和卸载NFS文件系统,包括权限管理
- rpc.lockd 非必要,管理文件锁,避免同时写出错
- rpc.statd 非必要,检查文件一致性,可修复文件
NFS配置文件
/etc/exports
/etc/exports.d/*.exports
配置文件详解
/dir  主机1(opt1,opt2)    主机2(opt1,opt2)...

主机格式:
anonymous:表示使用*通配所有客户端
单个主机:ipv4,ipv6,FQDN
IP networks:两种掩码格式均支持
172.18.0.0/255.255.0.0
172.18.0.0/16
wildcards:主机名通配,例如:*.wang.org,IP不可以
netgroups:NIS域的主机组,@group_name


每个条目指定目录导出到的哪些主机,及相关的权限和选项
默认选项:(ro,sync,root_squash,no_all_squash)
ro,rw 只读和读写
async 异步,数据变化后不立即写磁盘,先写入到缓冲区中,过一段时间再写入磁盘,性能高,安全性低
sync(1.0.0后为默认)同步,数据在请求时立即写入共享存储磁盘,性能低,安全性高
root_squash (默认)远程root映射为 nfsnobody,UID为65534,CentOS8 为nobody,CentOS 7以前的版本为nfsnobody
no_root_squash 远程root映射成NFS服务器的root用户
all_squash 所有远程用户(包括root)都变成nfsnobody,CentOS8 为nobody
no_all_squash (默认)保留共享文件的UID和GID
anonuid和anongid 指明匿名用户映射为特定用户UID和组GID,而非nobody,可配合all_squash使用,注意:目录需要给此用户权限,否则无法访问,后面跟数值而不是名称
subtree_check  用于检查请求的文件是否真的位于已导出的目录树中
no_subtree_check 不检查请求的文件是否真的位于已导出的目录树中

范例:
/data   10.0.0.0/24(rw,async,all_squash,anonuid=3232,anongid=3232,subtree_check)
配置文件相关命令
exportfs   可用于管理NFS导出的文件系统
-v #查看本机所有NFS共享
-r #重读配置文件,并共享目录 修改完配置文件,只执行此文件即可
-a #输出本机所有共享
-au #停止本机所有共享


showmount
#查看远程主机的NFS共享
showmount -e hostname


mount.nfs
    客户端NFS挂载
fg #(默认)前台挂载
bg #后台挂载
hard #(默认)持续请求
soft   #非持续请求
rsize #和wsize 一次读和写数据最大字节数,rsize=32768
_netdev #无网络服务时不挂载NFS资源
vers    #指定版本,客户端centos8默认4.2 ,centos7默认4.1 centos6默认4.0
nosuid  这个选项用来防止 suid(set-user-ID)和 sgid(set-group-ID)位的执行
noexec 此选项阻止在挂载的文件系统上执行任何二进制可执行文件

基于安全考虑,建议使用 nosuid,_netdev,noexec 挂载选项_


范例: 客户端将挂载写在/etc/fstab中
10.0.0.20:/data        /mnt       nfs      bg,hard,_netdev,nosuid,noexec    0 0
10.0.0.20:/data        /mnt       nfs      _netdev    0 0
数据实时同步
实时同步方法
- inotify + rsync 方式实现数据同步,需自行编写脚本组合inotify和 rsync 实现
- sersync :前金山公司周洋(花椒直播)在 inotify+rsync 软件基础上进行开发的,功能更加强大
工作原理
要利用监控服务(inotify),监控同步数据服务器目录中信息的变化 发现目录中数据产生变化,就利用rsync服务推送到备份服务器上
inotify:
异步的文件系统事件监控机制,利用事件驱动机制,而无须通过诸如cron等的轮询机制来获取事件, linux内核从2.6.13起支持 inotify,通过inotify可以监控文件系统中添加、删除,修改、移动等各种事件
检查内核是否支持
grep -i inotify /boot/config-5.15.0-112-generic
CONFIG_INOTIFY_USER=y
安装对应的软件工具包,提供inotify的用户操作接口
红帽:yum -y install inotify-tools

ubuntu  apt -y install inotify-tools
inotify 内核参数说明:
max_queued_events:inotify 事件队列最大长度,如值太小会出现 Event Queue Overflow 错误
默认值:16384, 生产环境建议调大,比如:327679

max_user_instances:每个用户创建 inotify实例最大值,默认值:128

max_user_watches:可以监视的文件的总数量(inotifywait 单进程),默认值:8192,建议调大
inotify-tools 内带工具
- inotifywait: 在被监控的文件或目录上等待特定文件系统事件(open ,close,delete等)发生,常用于实时同步的目录监控
- inotifywatch:收集被监控的文件系统使用的统计数据,指文件系统事件发生的次数统计
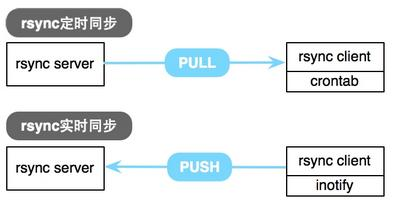
rsync 服务
rsync 常用于做为 linux系统下的数据镜像备份工具,实现远程同步,支持本地复制,或者与其他SSH、 rsync主机同步数据,支持增量备份,配合任务计划,rsync能实现定时或间隔同步,配合inotify或 sersync,可以实现触发式的实时数据同步
- 官方网站: http://rsync.samba.org/
- 服务器软件包:rsync(Ubuntu20.04),rsync-daemon(CentOS 8)
- 服务文件:/usr/lib/systemd/system/rsyncd.service
- 配置文件:/etc/rsyncd.conf
- 端口:873/tcp
rsync 有三种工作方式:
#Local: 代替 cp
rsync [OPTION...] SRC... [DEST]

#Access via remote shell:
Pull:
rsync [OPTION...] [USER@]HOST:SRC... [DEST]

Push:
rsync [OPTION...] SRC... [USER@]HOST:DEST


#Access via rsync daemon:
Pull:
rsync [OPTION...] [USER@]HOST::SRC... [DEST]
rsync [OPTION...] rsync://[USER@]HOST[:PORT]/SRC... [DEST]

Push:
rsync [OPTION...] SRC... [USER@]HOST::DEST
rsync [OPTION...] SRC... rsync://[USER@]HOST[:PORT]/DEST
The ':' usages connect via remote shell, while '::' & 'rsync://' usages connect
to an rsync daemon, and require SRC or DEST to start with a module name.
- 本地文件系统上实现同步。命令行语法格式为上述”Local”段的格式。
- 本地主机使用远程shell和远程主机通信。命令行语法格式为上述”Access via remote shell”段的格式。
- 本地主机通过网络套接字连接远程主机上的 rsync daemon。命令行语法格式为上述”Access via rsync daemon”段的格式。
- 前两者的本质是通过本地或远程shell,而第3种方式则是让远程主机上运行rsyncd服务,使其监听在一个端口上,等待客户端的连接
备份服务器开启rsync服务
1. 准备service文件
ubuntu22 自带service 文件    dpkg -L rsync  | egrep service
centos8 没有自带,rpm -ql rsync  | egrep service, 红帽系统需要安装rsync-daemon包提供service文件
2. 准备/etc/rsyncd.conf 文件
uid = root              #表示访问映射为root用户
gid = root
max connections = 0     #0表示不限制
ignore errors           #忽略传输过程中错误
exclude = lost+found/
log file = /var/log/rsyncd.log
pid file = /var/run/rsyncd.pid
lock file = /var/run/rsyncd.lock
reverse lookup = no     #禁止反向解析,将ip解析成域名
[backup1]                #向客户端暴露的模块,每个模块名对应一个不同的path目录,如果同名后面模块生效
path = /opt/backup1/
comment = backup dir    #此备份模块名字
read only = no          #可读可写
auth users = rsyncuser  #访问此模块用户名字
secrets file = /etc/rsync.pas   #访问此模块的密码文件

[backup2]                #向客户端暴露的模块
path = /opt/backup2/
comment = backup dir    #此备份模块名字
read only = no          #可读可写
auth users = rsyncuser  #访问此模块用户名字
secrets file = /etc/rsync.pas   #访问此模块的密码文件
以上为注释的配置文件,但是注意,配置文件中不能有#注释,不支持
uid = root
gid = root
max connections = 0
ignore errors
exclude = lost+found/
log file = /var/log/rsyncd.log
pid file = /var/run/rsyncd.pid
lock file = /var/run/rsyncd.lock
reverse lookup = no
[backup1]
path = /opt/backup1/
comment = backup dir
read only = no
auth users = rsyncuser
secrets file = /etc/rsync.pas

[backup2]
path = /opt/backup2/
comment = backup dir
read only = no
auth users = rsyncuser
secrets file = /etc/rsync.pas
3.服务器端准备相关目录和密码文件
1.准备相关暴露的模块目录

2.准备密码文件
echo "rsyncuser:123456" > /etc/rsync.pas
chmod 600 /etc/rsync.pas  #这一步必做,否则会报错
4.服务端启动rsync服务
#服务器端启动rsync服务
rsync --daemon #可加入/etc/rc.d/rc.local实现开机启动
systemctl start rsyncd   #CentOS 7 以上版本
rsync 客户端配置
echo "123456" > /etc/rsync.pas
chmod 600 /etc/rsync.pas   #此为必要项,权限必须修改

#查看远程rsync服务器的模块信息
rsync   rsync://rsync服务器IP

#交互式验证查看具体模块内的文件
rsync   rsync://rsyncuser@rsync服务器IP/backup

#非交互式查看共享目录
rsync --password-file=/etc/rsync.pas  rsync://rsyncuser@rsync服务器IP/backup

#客户端测试同步数据
rsync -avz --delete --password-file=/etc/rsync.pas    /data/www/ rsyncuser@rsync服务器IP::backup
inotify+rsync使用方式
- inotify 对同步数据目录信息的监控
- rsync 完成对数据的同步
- 利用脚本进行结合
注意: 此脚本执行前先确保两主机初始数据处于同步状态,此脚本实现后续的数据同步,备份服务器上装的是rsync server
#!/bin/bash
SRC='/data/www/'     #注意最后的/
DEST='rsyncuser@rsync服务器IP::backup'
#Ubuntu20.04不支持 --password-file=/etc/rsync.pas,可以使用下面的变量实现
export RSYNC_PASSWORD=123456
#rpm -q inotify-tools &> /dev/null ||yum -y install inotify-tools
#rpm -q rsync &> /dev/null || yum -y install rsync
inotifywait  -mrq  --exclude=".*\.swp" --timefmt '%Y-%m-%d %H:%M:%S' --format
'%T %w %f' -e create,delete,moved_from,moved_to,close_write,attrib ${SRC} |while
read DATE TIME DIR FILE;do
       FILEPATH=${DIR}${FILE}
       rsync -az --delete  $SRC $DEST && echo "At ${TIME} on ${DATE}, file  \
 $FILEPATH was backuped up via rsync" >> /var/log/changelist.log
        #rsync -az --delete --password-file=/etc/rsync.pas $SRC $DEST && echo  "At ${TIME} on ${DATE}, \
 file $FILEPATH was backuped up via rsync" >>  /var/log/changelist.log
done
sersync 实现实时数据同步
sersync 是前金山公司周洋在 inotify和rsync 软件基础上进行开发的,功能更加强大 sersync类似于inotify,同样用于监控,但它克服了inotify的缺点. inotify最大的不足是会产生重复事件,或者同一个目录下多个文件的操作会产生多个事件,例如,当监 控目录中有5个文件时,删除目录时会产生6个监控事件,从而导致重复调用rsync命令。另外比如:vim 文件时,inotify会监控到临时文件的事件,但这些事件相对于rsync来说是不应该被监控的
sersync 优点:
- sersync是使用c++编写,而且对linux系统文件系统产生的临时文件和重复的文件操作进行过滤,所以在结合rsync同步的时候,节省了运行时耗和网络资源。因此更快。
- sersync配置很简单,其中提供了静态编译好的二进制文件和xml配置文件,直接使用即可
- sersync使用多线程进行同步,尤其在同步较大文件时,能够保证多个服务器实时保持同步状态
- sersync有出错处理机制,通过失败队列对出错的文件重新同步,如果仍旧失败,则按设定时长对 同步失败的文件重新同步
- sersync不仅可以实现实时同步,另外还自带crontab功能,只需在xml配置文件中开启,即也可以按要求隔一段时间整体同步一次,而无需再额外配置crontab功能
- sersync 可以二次开发
sersync项目地址: https://code.google.com/archive/p/sersync/
sersync下载地址: https://code.google.com/archive/p/sersync/downloads
修改sersync配置文件,rsync daemon, 注意,sersync运行在rsync客户端,不是server端
<?xml version="1.0" encoding="ISO-8859-1"?>
<head version="2.5">
   <host hostip="localhost" port="8008"></host>
   <debug start="false"/> # 是否开启调试模式
   <fileSystem xfs="false"/>
   <filter start="false"> #不开启文件过滤功能,当为true时,以下类型的文件将不同步
 <exclude expression="(.*)\.svn"></exclude>
 <exclude expression="(.*)\.gz"></exclude>
 <exclude expression="^info/*"></exclude>
 <exclude expression="^static/*"></exclude>
   </filter>
   <inotify> # 监控事件,默认监控
delete/close_write/moved_from/moved_to/create folder
 <delete start="true"/>
 <createFolder start="true"/>
 <createFile start="false"/>
 <closeWrite start="true"/>
 <moveFrom start="true"/>
 <moveTo start="true"/>
 <attrib start="true"/>  #修改此行为true,文件属性变化后也会同步
 <modify start="false"/>
   </inotify>
   <sersync>  # rsync命令的配置段
 <localpath watch="/data/www"> #修改此行,需要同步的源目录或文件,建议同步目录
   <remote ip="备份服务器IP" name="backup"/>  #修改此行,指定备份服务器地址和rsync daemon的模块名,如果下面开启了ssh start,此时name为远程shell方式运行时的目标目录
   <!--<remote ip="192.168.8.39" name="tongbu"/>-->
   <!--<remote ip="192.168.8.40" name="tongbu"/>-->
 </localpath>
 <rsync>
   <commonParams params="-artuz"/>  # 指定rsync选项
   <auth start="true" users="rsyncuser" passwordfile="/etc/rsync.pas"/> #修改此行为true,指定备份服务器的rsync配置的用户和密码文件
   <userDefinedPort start="false" port="874"/><!-- port=874 --> #指定rsync的非标准端口号
   <timeout start="false" time="100"/><!-- timeout=100 -->
   <ssh start="false"/> #默认使用rsync daemon运行rsync命令,true为使用远程shell模式
 </rsync>
 <failLog path="/tmp/rsync_fail_log.sh" timeToExecute="60"/><!--default every 60mins execute once-->   #错误重传及日志文件路径
 <crontab start="false" schedule="600"><!--600mins--> #不开启crontab功能
   <crontabfilter start="false">  #不开启crontab定时传输的筛选功能
 <exclude expression="*.php"></exclude>
 <exclude expression="info/*"></exclude>
   </crontabfilter>
 </crontab>
 <plugin start="false" name="command"/>
   </sersync>
#####################################以下行不需要修改
####################################
   <plugin name="command">
 <param prefix="/bin/sh" suffix="" ignoreError="true"/> <!--prefix /opt/tongbu/mmm.sh suffix-->
 <filter start="false">
   <include expression="(.*)\.php"/>
   <include expression="(.*)\.sh"/>
 </filter>
   </plugin>
   <plugin name="socket">
 <localpath watch="/opt/tongbu">
   <deshost ip="192.168.138.20" port="8009"/>
 </localpath>
   </plugin>
   <plugin name="refreshCDN">
 <localpath watch="/data0/htdocs/cms.xoyo.com/site/">
   <cdninfo domainname="ccms.chinacache.com" port="80" username="xxxx" passwd="xxxx"/>
   <sendurl base="http://pic.xoyo.com/cms"/>
   <regexurl regex="false" match="cms.xoyo.com/site([/a-zA-Z0-9]*).xoyo.com/images"/>
 </localpath>
   </plugin>
</head>
准备密码文件,启动sersync
echo 123456 > /etc/rsync.pas
chmod 600 /etc/rsync.pas

sersync -h 可以查看帮助

注意:运行 sersync 需要有rsync客户端工具

#以后台方式执行同步
sersync2 -dro /usr/local/sersync/confxml.xml

#sersync支持多实例,也即监控多个目录时,只需分别配置不同配置文件,然后使用sersync2指定对应配置文件运行
sersync2 -rd -o /etc/sersync.d/nginx.xml
基于远程shell 实现 sersync
#不需要配置rsync daemon,只需要配置基于key验证的ssh即可
[root@data-centos8 ~]#ssh-keygen
[root@data-centos8 ~]#ssh-copy-id backup-server

#修改sersync配置文件
<?xml version="1.0" encoding="ISO-8859-1"?>
<head version="2.5">
   <host hostip="localhost" port="8008"></host>
   <debug start="false"/>
   <fileSystem xfs="false"/>
   <filter start="false">
 <exclude expression="(.*)\.svn"></exclude>
 <exclude expression="(.*)\.gz"></exclude>
 <exclude expression="^info/*"></exclude>
 <exclude expression="^static/*"></exclude>
   </filter>
   <inotify>
 <delete start="true"/>
 <createFolder start="true"/>
 <createFile start="false"/>
 <closeWrite start="true"/>
 <moveFrom start="true"/>
 <moveTo start="true"/>
 <attrib start="true"/>  #修改此行为true
 <modify start="false"/>
   </inotify>
   <sersync>
 <localpath watch="/data/www"> #修改此行,指定源数据目录
   <remote ip="备份服务器IP" name="/data/backup"/> #修改此行指定备份服务器地址和备份目标目录
   <!--<remote ip="192.168.8.39" name="tongbu"/>-->
   <!--<remote ip="192.168.8.40" name="tongbu"/>-->
 </localpath>
 <rsync>
   <commonParams params="-artuz"/>
   <auth start="false" users="root" passwordfile="/etc/rsync.pas"/> #必须修改此行,不启用认证start=false
   <userDefinedPort start="false" port="874"/><!-- port=874 -->
   <timeout start="false" time="100"/><!-- timeout=100 -->
   <ssh start="true"/> #修改此行为true,使用远程shell方式的rsync连接方式,无需在目标主机上配置启动rsync daemon服务
#####################################以下行不需要修改
####################################
 </rsync>
 <failLog path="/tmp/rsync_fail_log.sh" timeToExecute="60"/><!--default every
60mins execute once-->
 <crontab start="false" schedule="600"><!--600mins-->
   <crontabfilter start="false">
 <exclude expression="*.php"></exclude>
 <exclude expression="info/*"></exclude>
   </crontabfilter>
 </crontab>
 <plugin start="false" name="command"/>
   </sersync>
#将中间的行可以删除
</head>


sersync2 -dro /usr/local/sersync/confxml.xml